Standard options and upgrades for Lancer X
Rain and light sensor on Lancer X
Installation, activating and adaptation of rain and light sensor on Mitsubishi Lancer X.

Lancer-X.net
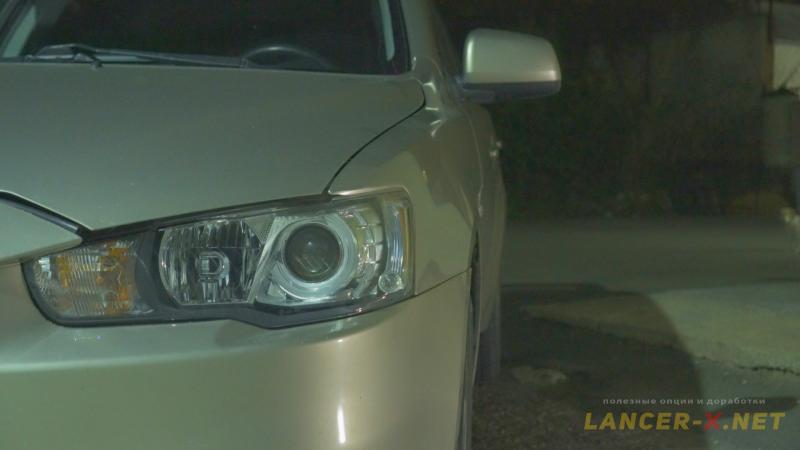
Rain sensor is an option, which can be completely dispensed with. But I drove cars, which had the installed rain sensor from the factory and was completely satisfied how this option operated in the rain. That is why, without any doubt, I bought the set from right-hand drive donor from the wreck yard and planned the installation of rain sensor on the windscreen on my Mitsubishi Lancer X.
Plus, as a bonus, this sensor is combined, i.e there are 2 types of sensors in the one housing: rain sensor and light sensor.
For easy reference, this instruction is represented in 2 versions: text and video at the end.
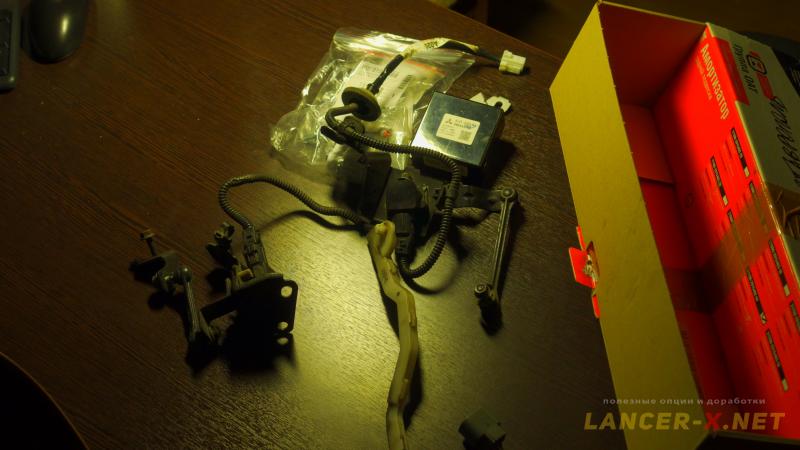
The list of components for rain sensor installation on Mitsubishi Lancer X
1. Rain and light sensor on the windscreen. There are several types of your choice, the larger last three numbers in the item number, the newer the sensor.
- 8634A001 (I have this one)
- 8634A052
- 8634A062
- 8634A109
2. The lens of rain and light sensor- Pma-tools 133601373 (with tape already attached).
It is attached on the windscreen. In my case, it was the second-hand lens, that is why I scrubbed the tape with the finger and ordered the new tape for the lens.
3. Tape for the lens - 13360181.
I bought several pieces for two reasons. The first one, that it is rather difficult-to-obtain. The second reason is for the case, if one can't stick it right the first time. Or you can buy a clear acrylic double-sided tape and cut to the size you need.
4. Bracket of rain and light sensor - 7259A041.
5. Decorative moulding of rain and light sensor - 7630A022.
6. There is no necessity of installation the understeering switch with Auto mode, the standard one is sufficient.
7. Wiring 8510a453 (throw 3 wires).
8. Film strip Oracal 641-070M (oracal is holding up well).
9. Double-sided tape for the bracket.
Installation of rain sensor on Mitsubishi Lancer X
The wiring from the donor I got fully standard, but I won't lay it all instead the standard, as the standard wiring attached on clips, which breaks very easy. On the donor wiring every of these clips are broken.

That is why I am going to unplait 3 wires with the connector, that are necessary for rain and light sensor connection and lay them along the standard wiring.
You can make the same wiring independently, you will need 3 wires. And the connector for the rain sensor, according to reviews, is ideally suited from the power of the floppy drive.

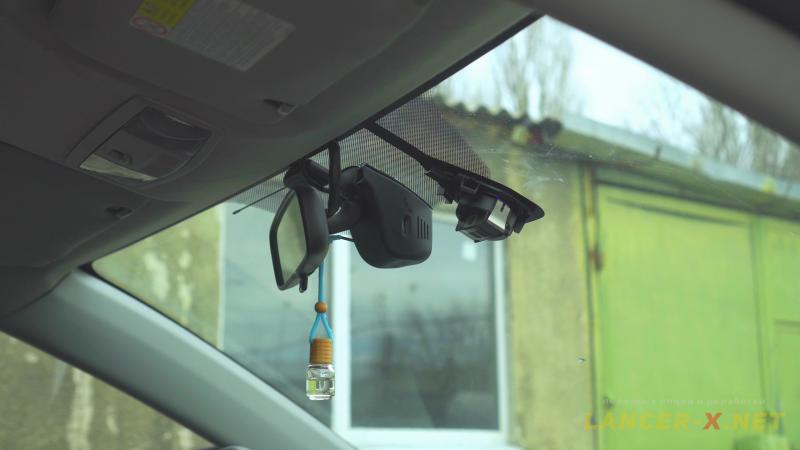
Remove handles, sun visors, ceiling lamp and side plates of the front racks.

Lay 2 wires from the rearview mirror along standard wiring up to ETACS unit.
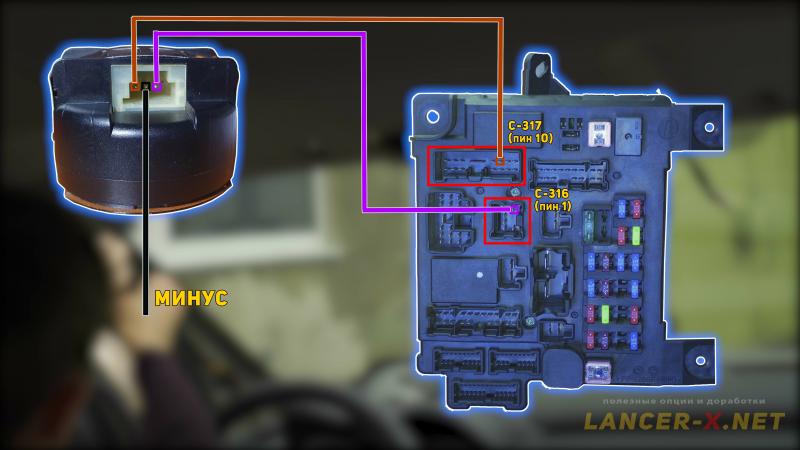 Connect in accordance with the following scheme:
Pin No. 1 of rain and light sensor (Brown wire), this pin is responsible for rain sensor operation. Connect pin No.10 of ETACS unit in C-317 connector.
Pin No.2 of rain and light sensor (black wire), this is minus. Connect on any minus junction. For example near the ceiling lamp.
Pin No. 3 of rain and light sensor (purple wire), this pin is responsible for light sensor operation. Connect pin 1 of ETACS unit in C-316 connector.
After that, install the ceiling facing place back.
If there is the special seating positions for rain and light sensor on your windscreen, then you can start the bracket assembling.
But I have Mitsubishi Lancer 10 with simple glass, without area for rain and light sensor. That is why, it is necessary to stick the black film, cut along the outline of decorative cover of rain and light sensor on the windscreen to hide all rain and light sensor internals outside.
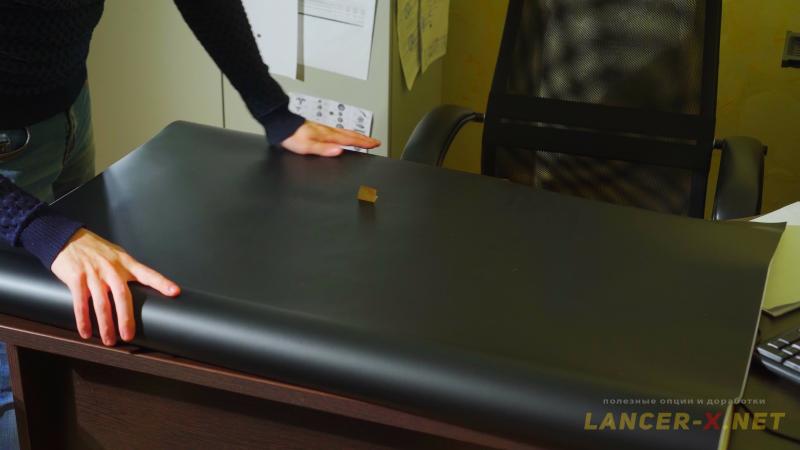 For this purpose, you can use any black film, but it is better to buy Oracal film, as it sticks better to the glass. I have bought Oracal 641-070M film in the ad agency.
Removing the required dimensions, I prepared a substrate template for rain and light sensor on Mitsubishi Lancer X, link for download
Посмотреть онлайн файл: shablon-nakladki-datchika-dozhdja-lancer-10.pdf
shablon-nakladki-datchika-dozhdja-lancer-10.pdf
(Скачали 1583)
1.32 Mb
Посмотреть онлайн файл: shablon-nakladki-datchika-dozhdja-lancer-10.pdf
Download, print, cut.
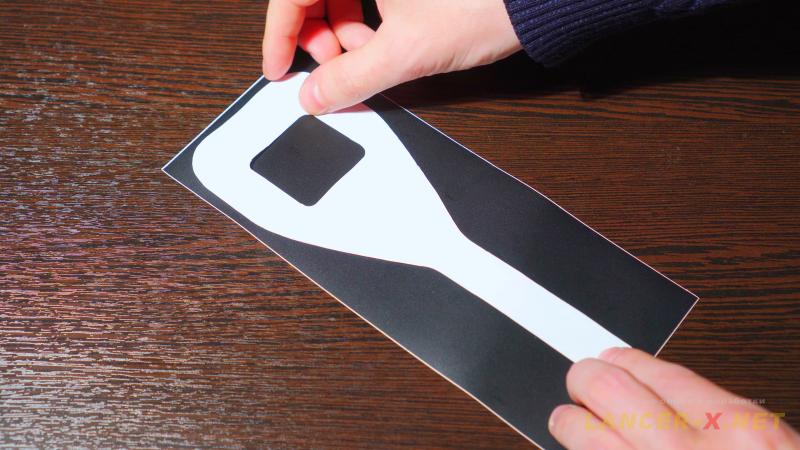 Cut a small piece from the black film. And apply a substrate template to the film to trace the contours. It is better to do on metal surface, pressing with magnets.
 After that, cut the final variant of substrate and glue it on the windscreen, pre-degrease the surface and warm it up a little with a hairdryer.
 Stick the tape on the lens, and next the lens itself to the windscreen. Also pre-degrease everything the and warm it up. It is better to watch the sticking process on the video. Try to stick everything as neatly as possible and without bubbles.
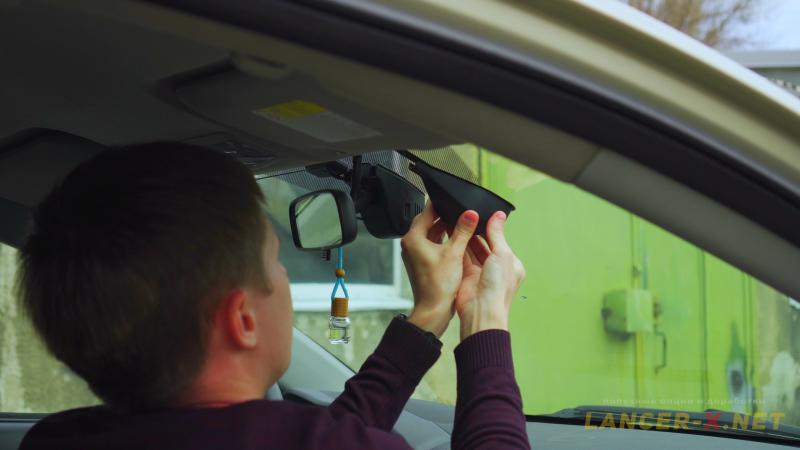 Now stick the double-sided tape on the bracket and stick on the windscreen. It is better to mount the bracket with the rain and light sensor decorative cover snapped on, so everything will stick as smoothly and beautifully as possible.
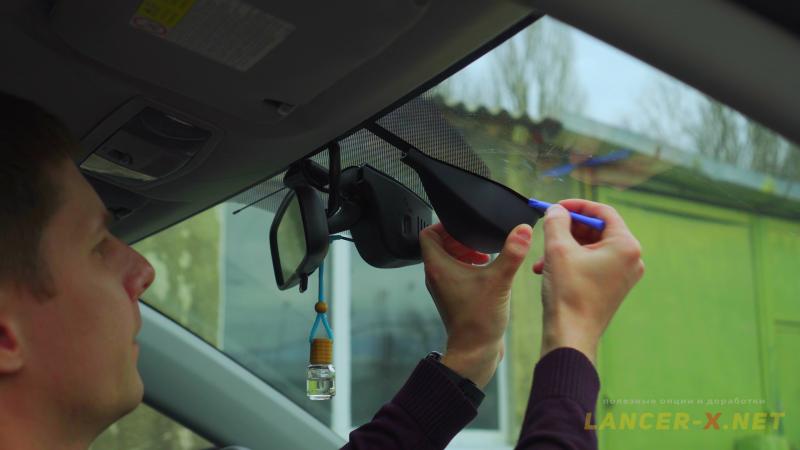 It is easy to remove the decorative cover, to do this, squeeze the lower edges of the decorative cover, so you unfasten the lower latch. Next, insert a paper clip or plastic puller into the resulting gap and lead up to the side latch, after which we pull towards the door and slightly down, the decorative cover will immediately be removed.
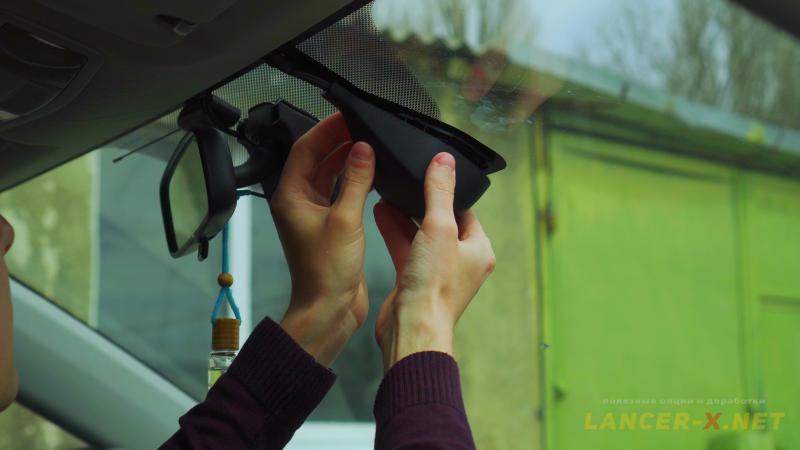 Install the rain and light sensor in its rightful place, lay the wire and connect it. Snap on the decorative rain and light sensor cover.
It is not necessary to install the understeering switch with Auto mode, it is sufficient to transfer the switch in the INT mode (interval).
Activating the rain sensor on Mitsubishi Lancer X
Before activating, I advise you to read the article where discussed in detail how to activate the hidden functions and options on Mitsubishi Lancer X.
To activate the rain and light sensor, you will need:
1. J2534 compatible adapter. Bought here: Аliexpress
Реклама. ООО "АЛИБАБА.КОМ (РУ)", ИНН 7703380158
2. MMCodingWriter, the program for downloading and coding recording.
3. MUT Coding Mitsubishi, the program for coding editing.
4. Laptop.
Since 2021, the MUT Coding Mitsubishi program has become paid, or you can buy it from the developer, or use the built-in editor in the MMCoding Writer program.
Always do backup copies for original Variant and Custom codings!!!!!!!!!!
Find and activate the following points in the Variant:
— RLS - - > Present (this is the rain sensor activating).
— Front wiper - - > Rain Sensitive (it is dependence on operation from rain sensor)
— Auto Light Control - - > Low threshold (RLS) (this is the light sensor activating, the marker lights switch-on first, and then, when it will get darker the low beam).
Find and activate the following points in the Custom:
— Front Wiper Operation - - > Rain Sensitive (this is the dependence on operation from rain sensor).
Also, depending on your region, you can adjust the sensitivity of light sensor in Custom coding in the Sensitivity for auto lamp point.
Adaptation of rain sensor on Mitsubishi Lancer X
 At the first test of the rain sensor, everything operates well, I pour less water, the rain sensor operates less actively, I pour more water, the sensor operates more actively.
But sometimes, in clear weather, my wipers operated at the same time after starting the engine or while driving. In this case, it is necessary to perform the rain sensor adaptation on Mitsubishi Lancer X in the MMCodingWriter program.
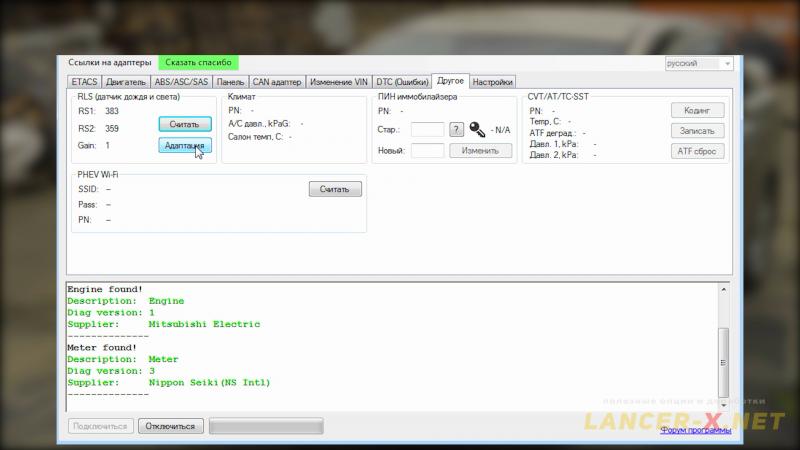
Click the button to calculate, and then adapt.
In 50% of cases, adaptation is enough for the rain sensor to operate correctly on the Mitsubishi Lancer X. But it didn't help me. In this case, there is another solution, which I found on drive2.
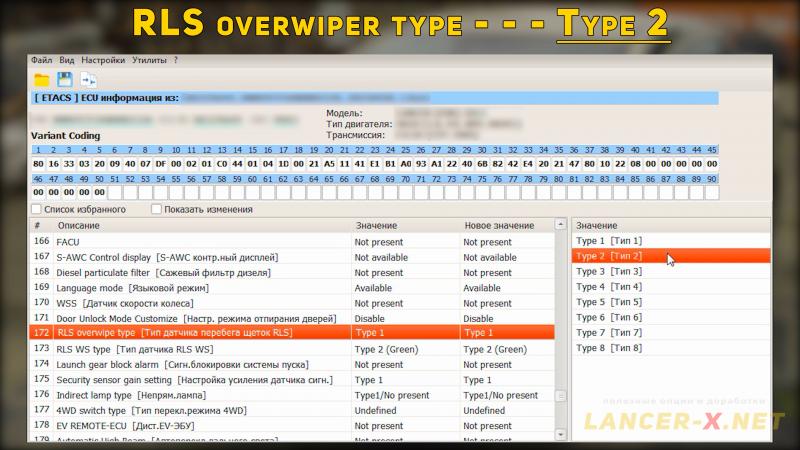 It is necessary to find this point RLS overwiper type in the Custom coding. And choose Type2 (it was Type1 before).
After that, the rain sensor began to operate correctly, the false operations disappeared.
But a week later, the rain sensor began to operate incorrectly again, it turned out that bubbles formed on the lens (between the tape and the windscreen), which the rain sensor perceived as rain. I had to re-stick the lens.
After re-sticking, I drove for 2 weeks, the rain and light sensor operates perfectly.
Video instruction for rain and light sensor installation on Mitsubishi Lancer X
Related links: